Microsoft Bookings is an online scheduling tool through Office 365 that allows for easy appointment scheduling.
What is Microsoft Bookings?
Microsoft Bookings is an online scheduling tool that is part of Office 365. Bookings allows users to set up calendars and manage availability for themselves or a group, so that others can book appointments with them efficiently. Bookings can stand alone or integrate with Outlook calendar and email to ensure the accuracy of individual’s availability and to send event invitations and reminders.
Bookings has three primary components:
A booking page where your customers and clients can schedule appointments with the staff member who should provide the service or run the appointment. This web-based scheduling page can be shared via a direct link, your Facebook page, and even through link embedding within your website.
A web app that contains a set of web-based, business-facing pages where Bookings calendar owners and administrators within an organization can define appointment types and details, manage staff schedules and availability, set business hours, and customize how appointments are scheduled. These pages allow for versatility and the ability to customize a Bookings calendar to fit the diverse needs of the person or organization.
A business-facing mobile app where Bookings calendar owners and administrators can see all of their appointments, access customer lists and contact information, and make manual bookings on the go.
Why Use Bookings?
Instructors can use Bookings to provide their availability for office hours and allow students to book appointments. Staff can use Bookings to provide their availability to both internal and external colleagues and allow them to schedule a time for a meeting or event.
How Is Microsoft Bookings Different From Using the Outlook Calendar?
With Microsoft Bookings, you can set available windows to allow appointments to be scheduled within them as well as set the appointment length and who the email notifications go to. You, the business, and the client will both receive an email that a booking has been made. Also, it will be on your Outlook calendar so reminders will work as usual. Once your booking is set, the rest is managed for you. For instance, a faculty member can set office hours and allow students to select 30 minute windows within a time period.
How do I schedule using Microsoft Bookings?
- Click on the link provided to you via sharing, email, or social media to open the Microsoft Bookings screen.
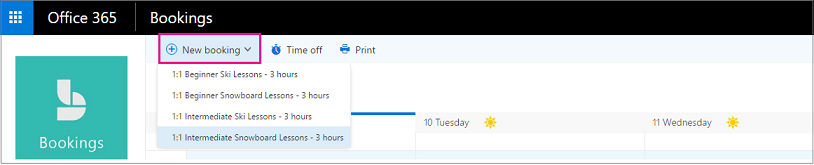
- In the Select Service section at the top of the screen, click on the type of appointment you want to schedule.
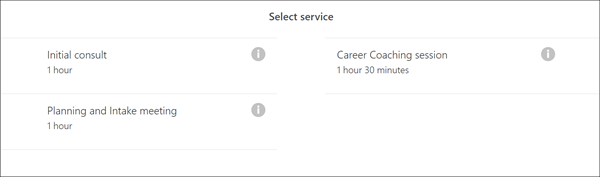
Figure 1: Select the type of service you want to schedule.
The options in the Select Time section below will refresh to show available dates to schedule your selected type of service.
- In the Select Time
section, click on a date from the calendar to view the available
appointment times on that date. The current date will be selected
initially by default. Use the arrow buttons to the left of the month to
scroll to another month.
NOTE: If a date is grayed out on the calendar, it means that there are no available appointments on that date.
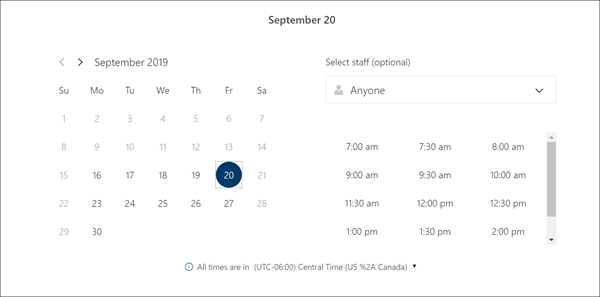
Figure 2: Select the date for your appointment.
NOTE: As you select options for your appointment, the section title will update to show your selections.
- If you want to book your appointment with a specific person, use the Select staff (optional)
drop-down to choose their name. Leave the drop-down set to “Anyone” to
view all available appointment times on the selected date.
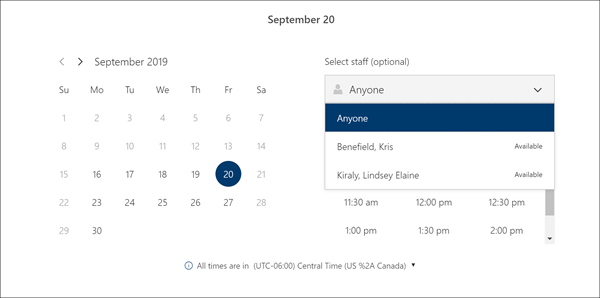
Figure 3: Choose a specific staff member for your appointment (optional).
The appointment times below will refresh to show only the available
times for your selected staff member or all available times if you
selected “Anyone”.
- Click on any of the available times listed to choose your appointment time.
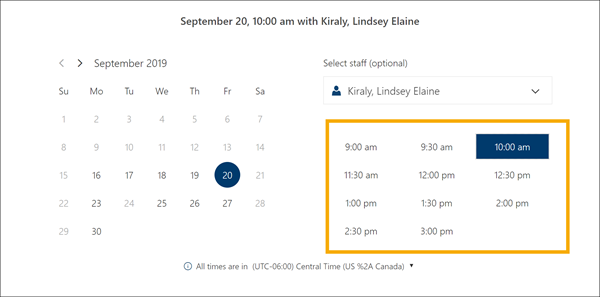
Figure 4: Select an available time for your appointment.
- In the Add Your Details section below, enter your name and contact information in the fields provided.
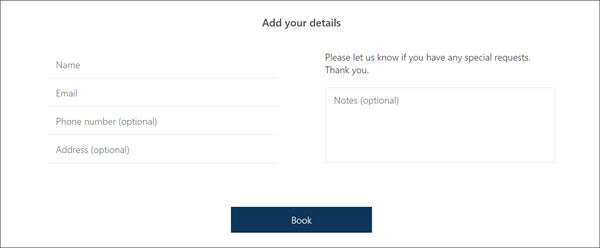
Figure 5: Enter your contact information.
- If you have any additional information or requests you would like to submit, use the optional Notes field to the right.
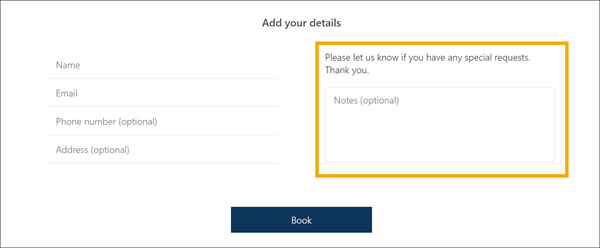
Figure 6: Use the optional Notes field to submit any additional information.
- Click the Book button at the bottom of the screen to schedule your appointment.
Once your appointment request is submitted, you will receive an email
confirmation for your appointment. This email will contain a link to add
the appointment to your calendar.
How do I set up Microsoft Bookings for my department?
Tips
- Use a good naming convention for your Booking site display name, do not name it the same as an individual. The page will be, by default, available in the global address list, and this could cause confusion. Make the name be unique. For instance, prepend the name of the office – example: IT Services – Collaboration Tools.
- Add Buffer time if you need to allow for transit time between appointments, or if you would like time before the next appointment.
- Set up more than one service to allow for appointment times of varying lengths.
- Change the theme of your booking page to personalize it.
- If you are holding your appointments in a shared resource location (e.g. a meeting room on campus), then create meetings with those resources in your Outlook before publishing your Bookings page. Bookings will not book meeting rooms for you; those have to be done in Outlook.
- Customize the notifications for your services
1. Enter your business information
In Microsoft Bookings, the Business Information page within the web app contains all the details that you'd typically find on a business' "About us" page. These details include your a relevant name, address, phone number, web site URL, privacy policy URL, logo, and business hours.
The information you provide here will be displayed on the page customers and clients use to book appointments (known as the booking page) and in messages and reminders sent to them by Bookings.
In Microsoft 365, select the app launcher, and then select Bookings.
In the navigation pane, select Business information.
Enter the relevant name, address, and phone number you would like to use for your Bookings calendar.
In Send customer replies to, type the preferred email address where email replies to booking confirmations and reminders should be forwarded.
In Website URL, enter the URL of the home page for your business. which will appear as a direct link.
Enter the privacy policy and terms & conditions URL and they will be hyperlinked as such.
Select Save.
2. Set your scheduling policies
Not all appointments are the same. Some take only a few minutes, while others can take hours or more. In Microsoft Bookings, the Booking page is where you set the scheduling policies for your business. Scheduling policies include the length of appointments, acceptable lead and cancellation times, and automatic notifications of booking changes. Additional customization can be added for each service within the Services page, with additional duration settings and policies that apply only to that service.
The policies you set here are the top-level policies. They are automatically applied to all the services you offer unless you choose to modify them on a per-service basis.
In Microsoft 365, select the app launcher, and then select Bookings.
In the navigation pane, select Booking page.
Select your policies under the Scheduling policy section.
Select Save and publish.
Types of scheduling policies:
Policy | Explanation |
Time increments | Determines the intervals between appointments. You can set your time increments from 5 minutes to 4 hours. You can also set your own customized time increments. An interval of 15 minutes, for example, means a customer could schedule a 60-minute appointment at 8:00, 8:15, 8:30, and so on. Conversely, a 60-minute interval means that appointments are only available on the hour. |
Lead time in hours | You build your staffing plan based on the appointments that are scheduled so it's important to know in advance how many customers are coming in for service on any particular day. The lead time policy enables you to specify the number of hours in advance that customers should book or cancel an appointment. |
Maximum days in advance | If you want to limit how far in advance customers can book appointments, then this is the setting for you! You can set the maximum for 365 days or more. |
Notify when a booking is created or changed | Select this option when you want to receive an email any time a customer books an appointment or changes an existing one. The email will go to the mailbox specified on the Business information page. |
3. Define your service offerings in Microsoft Bookings
When
you define your service offerings in Microsoft Bookings, you set, among
other things, a service name, description, location (choose whether you
want to meet in person or have an online meeting), duration, default
reminders to customers and staff, internal notes about the service, and
pricing. You can also tag the employees who are qualified to provide the
service. Then, when customers come to your business web site to book an
appointment, they can see exactly what types of appointments are
available, choose the person they want to provide the service, and how
much their service will cost.
You
can now add customized information and URLs to the email confirmation
and reminders that you send when someone books a service through your
booking page.
-
In Microsoft 365, select the app launcher, and then select Bookings.
-
In the navigation pane, select Services > Add a service.
-
Enter the service details including name, description, and location. When you start typing an address in Default location, Bing will suggest locations for you.
-
Enter the duration required for the service.
You can enter how long you want the duration to last in days, house and
minutes, and set a buffer time when customers can't book.
-
Select the price model. For Fixed price, Starting at, and Hourly, you'll be asked to specify a price.
-
Under Price and payments, set the default price for the service.
-
Enter additional notes and reminder information.
-
Select Save.
3a. Assign a staff member to the service
When
assigning staff, think about whether the service requires advanced
training or special certifications. If so, only assign the staff members
who hold those credentials. If the staff member you want to assign
isn't in the list, you'll have to go to the Staff page to add them.
-
On the Services page, select those employees
who are qualified to provide this service. You can select one or more.
Selected employees have a check mark next to their names.
-
Select Save.
3b. Set publishing and scheduling policy options
By
default, your service details and staff assignments will be posted to
the booking page on your web site as soon as you select Save.
Also, the scheduling policies you set will be applied by default to the
service you created. If you don't want to accept these defaults, follow
these steps.
-
On the Services page, under Publishing options, clear the checkboxes next to Show this service on the booking page and/or Use the default scheduling policy.
-
Set the scheduling policies for this service.
-
Select Save.
3c. Add online meeting option to bookings
You
can set up your services with an online meeting option. When you or a
customer creates a new booking, or updates an existing booking, you have
the option to make it an online appointment, using Microsoft Teams or
Skype for Business.
-
On the Services page, select the toggle to turn on online meetings.
-
Select Save.
Once you select Add online meeting,
all your staff members who have a Teams license or Skype for Business
license will be enabled for this service.
NOTE: Your customer doesn't have to have a Teams license or Skype for Business
license. They also don't need to have Teams or Skype for Business
installed. Once they click on the link to join the online meeting,
they'll be able to use Teams and Skype for Business through their
browser.
3d. Group bookings
Group
bookings lets you to set up service appointments where multiple people
can join a session with a single staff member. You can use group
bookings to schedule conferences, lectures or training sessions with
several people at the same time.
-
On the Services page, under Maximum number of attendees,
enter the number of people who can attend this event. Once you set the
maximum number, the attendee list can't exceed the number you set. By
default, this field is blank.
-
Select Save.
Once you've set up the appointment on your calendar, you can add users to the service and send them an email invite.
3e. Text message notifications
You
can now set up your services with text notifications. When your
customer creates a new booking or updates an existing booking on such
service, they will have the option to receive reminder text messages.
Your customer will have to agree to getting text messages on the self service page before they can receive them.
-
On the Services page, under Reminders and Confirmations, select Enable text message notifications for your customers.
-
Select Save.
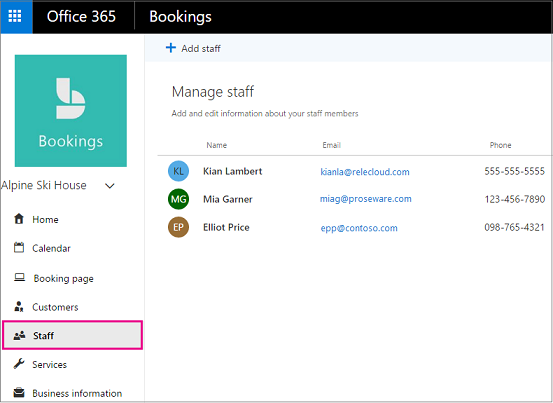
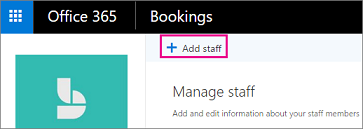
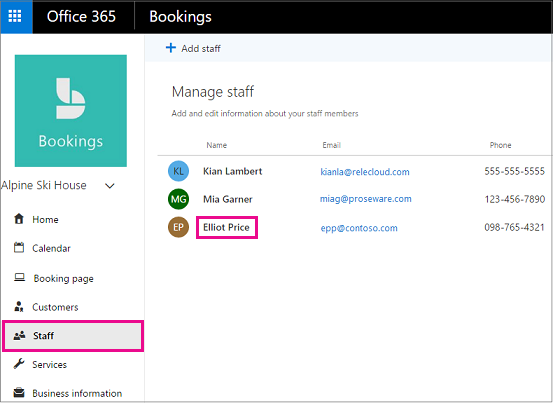
4. Create your staff list
The
Staff page in the Microsoft Bookings app is where you create your
staffing list and manage staff member details such as name, phone
number, and email address. You can also set working hours for each staff
member from this part of the app.
-
In Microsoft 365, select the app launcher, and then select Bookings.

-
In the navigation pane, select Staff.
-
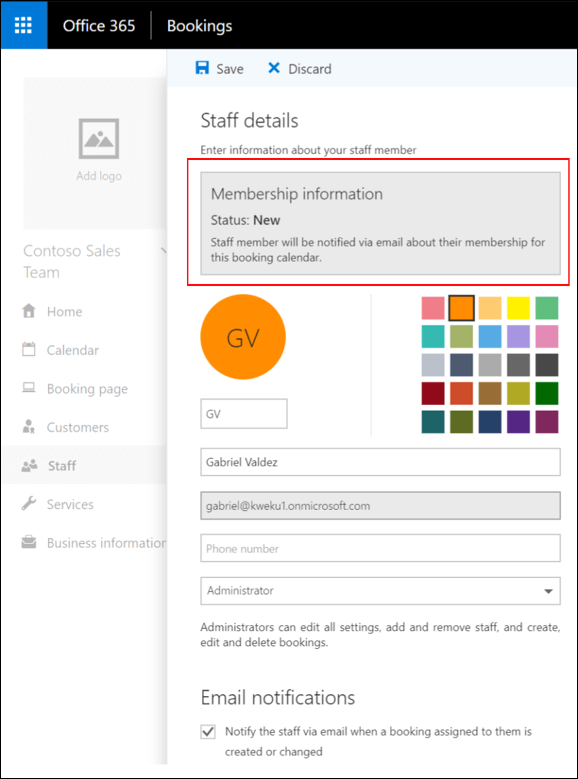
Select Add staff.
-
Select a color for the staff member, provide their initials, name, email address, and phone number.
-
Set the access level for this employee. Choices are:
|
Role
|
What this means
|
What you can do in Bookings
|
|
Administrator
|
Staff member has a Microsoft 365 account
|
|
|
Viewer
|
Staff member has a Microsoft 365 account
|
-
See your own bookings on your personal calendar
-
Receive a meeting invitation when assigned to a
booking so you can add it to your personal calendar (valid email address
required)
-
Receive email reminders of upcoming bookings
-
Receive notifications of cancellations and changes
|
|
Guest
|
Staff member doesn't have a Microsoft 365 account
|
-
Be signed up to deliver booked services but cannot access Bookings
-
Receive a meeting invitation when assigned to a
booking so you can add it to your personal calendar (valid email address
required)
-
Receive email reminders of upcoming bookings
-
Receive notifications of cancellations and changes
|
-
Select Save.
Note: When you add an employee in
your organization as a staff member (as a guest, admin, or viewer), your
employee will get an email letting them know that their availability
may be shared, and that they could be booked through a booking page.
-
Repeat steps 1 through 6 for each staff member.
5. Set employee working hours
Setting
employee working hours ensures that their availability is accurately
represented when you or your customers try to book them. By default, the
working hours for each of your employees match the business hours
you've established in the Microsoft Bookings app. But you can customize them to match the needs of your business and employees. This customization happens on the Staff page.
-
In Microsoft 365, select the app launcher, and then select Bookings.
-
In the navigation pane, select Staff, and then select the staff member whose hours you want to set.
-
Under Working hours, clear the Use business hours checkbox.
-
Use the dropdowns to select start and end times for each day. Times are available in 15-minute increments.
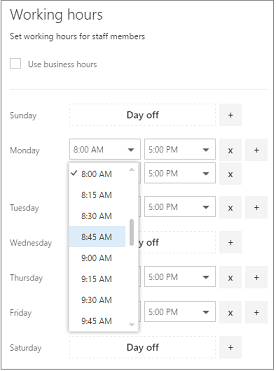
-
Click + to add start- and end-time selectors.

-
Select Save.

6. Schedule business closures, time off, and vacation time.
Occasionally, you'll want to close your business for holidays or team
events, and your employees will need time off when they're sick, on
vacation, or unavailable for other reasons. You can schedule time off
from the Microsoft Bookings calendar, and the employee will be
unavailable for bookings during the specified time. Once the business
reopens or employees return to work, everyone will be listed on the
booking page according to their established work hours.
-
In Microsoft 365, select the app launcher, and then select Bookings.
-
In the navigation pane, select Calendar > Time off.
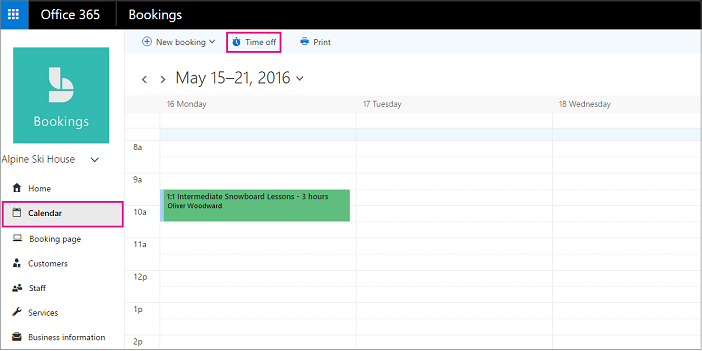
-
Fill in the details, including a title, start and end date and times, location, and additional notes.
-
Select All day event.
-
Select all staff members.
-
Select Save.
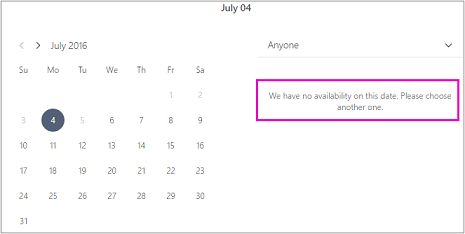
When a customer attempts to schedule service on a day the office is closed, they'll see a message on the booking page.
Schedule employee time off
-
In Microsoft 365, select the app launcher, and then select Bookings.
-
In the navigation pane, select Calendar > Time off.
-
Fill in the details, including a title, start
and end date and times, location, and additional notes. If the employee
will be gone for a full day or for several days, select All day event.
-
Select the staff member or members who are taking the time off.
-
Select Save.
7. Publish the booking page
-
In Microsoft 365, select the app launcher, and then select Bookings.
-
In the navigation pane, select Booking page.

-
Verify your scheduling policies are correct. See Set your scheduling policies for more information.
-
Select Save and publish. You'll see a confirmation message.
-
Select Open published page to see your page in a web browser.
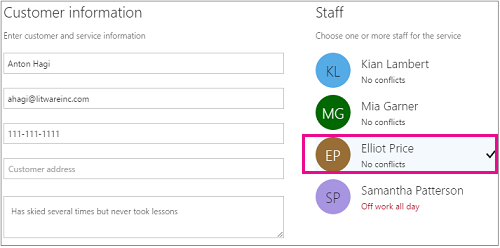
8. Create and staff your bookings
-
In Microsoft 365, select the app launcher, and then select Bookings.
-
In the navigation pane, select Calendar > New booking.
-
Select the service to be provided. See Define your service offerings for service set-up instructions.
-
Enter the customer information, including name, email address, phone number, and other relevant details.
-
Select the staff member to provide the service. The list of staff members shown is based on what you set up on the services page.
-
Enter the service details, including date,
time, location, and other relevant information. Once you enter a valid
email address for the customer, the Save button will change to Send,
and you'll see a note telling you that a confirmation will be sent to
the customer. The customer confirmation includes an attachment for them
to add to their calendar. Selected staff members will also receive
meeting invitations with the appointment information so they can add it
to their personal calendars.
-
Select Add an email reminder.
-
Specify when the reminder should be sent, where it should be sent (Customer, Staff, All attendees), and what the reminder message should be.
-
Select Save > Send.
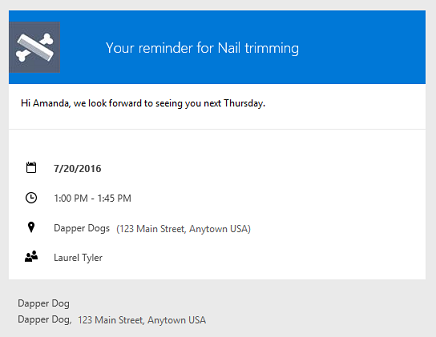
Here's an example email of the reminder your customer will receive.